How to add a date to a W9 PDF is a common question for individuals and businesses filling out this IRS form electronically.
Whether you need to insert the date using Adobe Acrobat, an online editor, or free options, there are multiple ways to do it without printing and scanning the document.
This guide will walk you through the easiest methods, highlight useful tools, and provide tips to ensure your W9 form is completed correctly.
PDF Candy
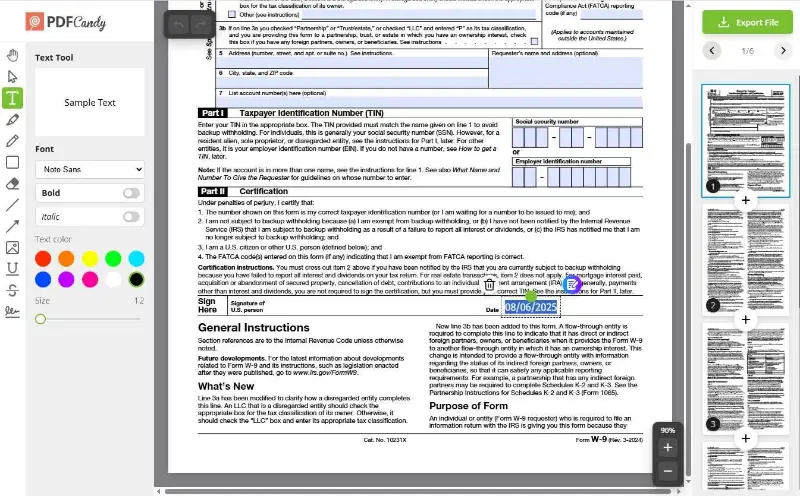
PDF Candy offers a straightforward online solution to modify documents, including inserting dates into your W9 form. It operates fully within your web browser, eliminating the need for downloads or installations and allowing access from any device with connectivity.
How to add a date to a W9 PDF with PDF Candy
- Navigate to the online form filler.
- Upload your document by dragging it into the box or browsing your files.
- After the file opens, click on the spot reserved for the date.
- Enter the accurate numbers where required.
- Customize the text size, font, and placement to ensure it fits seamlessly with the form.
- Click "Apply changes" to finalize your edits.
- Download the modified version to your computer or device.
If the date box isn't active, select the text option from the toolbar on the left.

Adobe Acrobat
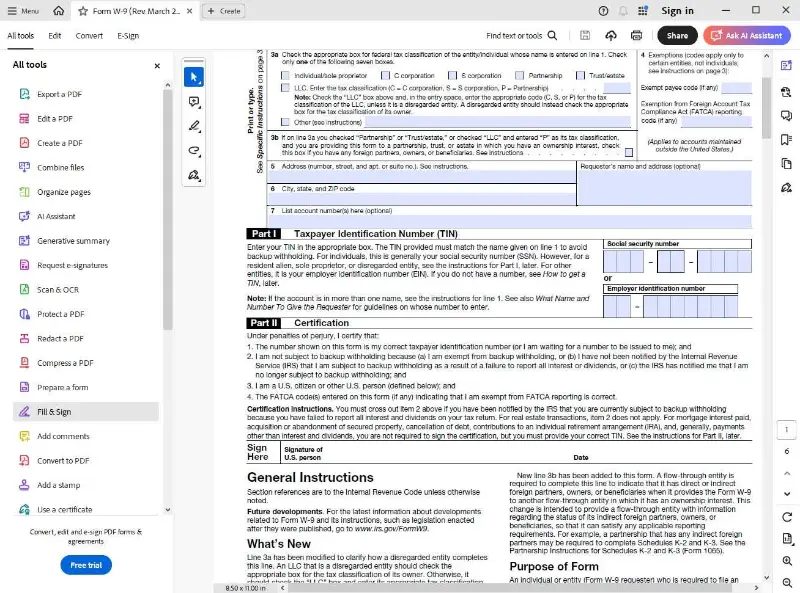
Adobe Acrobat is a leading application known for its extensive toolkit that allows precise modifications and writing on PDF. It enables you to effortlessly insert text, including dates, while maintaining document integrity. This software runs on both Windows and macOS systems.
How to add date to W9 in Adobe
- Launch Adobe Acrobat on your device.
- Go to "Menu" > "Open" and pick your W9 form.
- Choose the "Fill & Sign" option located in the left-hand menu.
- Click on the place for the date entry.
- Input the accurate day, month, and year accordingly.
- Export your updates via "Menu" > "Save" or "Save As".
- Continue editing PDF in other fields or exit the program.

Why can't I add a date to W9 PDF?
If you’ve attempted to insert a date into your form and found it impossible, you’re not the only one facing this challenge.
Several factors can cause this limitation, often related to the file’s design or the software used. Understanding these reasons helps you find the best workaround.
| Issue | Reason | Solution |
|---|---|---|
| Uneditable PDF | The file is a static image-like document without interactive elements for typing. | Utilize advanced PDF software like Adobe Acrobat or Foxit that allows form completion. |
| Security Restrictions | Changing is blocked by protection settings to preserve the original authenticity. | Create an unsecured version by saving a copy or convert it into an editable format such as Word. |
| Limited Viewer Functionality | Basic readers (e.g., browsers or default apps) don’t support adding or modifying text fields. | Switch to specialized editing programs or online platforms that support text insertion. |
| Absence of Input Fields | The form lacks specific areas designed for data entry, including the date section. | Apply annotation or “Fill & Sign” tools to place text boxes freely on the document. |
Tips for correctly completing the date field
How to add a date to a PDF might seem straightforward, but even minor slips can lead to processing delays or rejection. Follow these practical suggestions to make sure your form is accurate and compliant.
Stick to the Accepted Format:
The IRS prefers dates in the MM/DD/YYYY layout. For instance, write 08/06/2025 instead of alternatives like “6th August 2025” or “2025-08-06” to avoid confusion.
Verify the Calendar Year:
Make certain the year reflects the current tax period. Using an outdated or future year may cause your form to be questioned.
Avoid Shortened or Ambiguous Dates:
Refrain from abbreviating months (e.g., “Aug”) or truncating years (“8/6/25”) since these can be misinterpreted.
Maintain Consistency in Typeface:
When typing the date digitally, match the font style and size to the rest of the document for a clean, professional look.
Common Mistakes to Avoid
1. Never Skip the Entry
Leaving the date blank can result in your W9 being rejected. Always ensure this section is complete before submission.
2. Watch for Typographical Errors
Mistakes such as swapped digits or extra numbers can complicate verification. Review your input carefully.
3. Limit Handwriting to When Necessary
If you must fill out the form manually, write clearly and without smudges to prevent misunderstandings.
4. Confirm Auto-Filled Dates
Some PDF tools insert the current date automatically. Double-check it reflects the intended day, especially if you prepared the form earlier.
5. Keep Formats Uniform Throughout
Consistency is key. Using different styles for various dates within the same form might cause confusion or processing issues.
Conclusion
Adding the date to your W9 PDF is a straightforward task when you utilize the right tools.
By following the steps outlined in this guide, you can quickly fill in the document electronically, save time, and avoid common mistakes.
Whether you choose an online editor, desktop software, or mobile app, ensure your final paper is correctly saved and securely shared with the requesting party.
.webp)


